Preveza: Arthur's Complete Breakdown

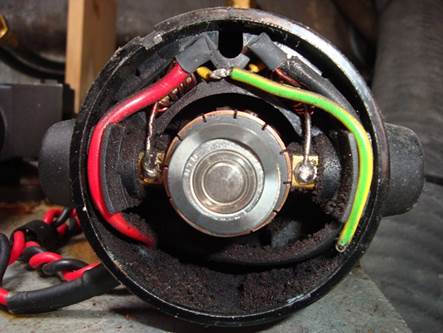
38.58.054N 20.45.633E After a day at anchor to recover from the passage we had a good look at Arthur and realised a nut had come loose that connects the hydraulic arm to the rudder stock (one of those nuts that are self locking so they don’t come loose – allegedly). We replaced the nuts and tightened it up hoping that this would solve the problem. Arthur would now not even start. We then went into Preveza marina to do a few jobs and investigate Arthur some more. We serviced both the loo pumps which involves that lovely job of bashing the loo pipes against the pontoon to remove the scale build up in the pipes, changed the fans belts (sound simple….well it took a full day with a lot of swear words) and then investigated Arthur a lot more. For the technical among you the steps to isolate which component has failed is below. In summary it was his “brain” that had failed (ie computer). Of course the new computers for the autopilots don’t integrate with all our existing instruments which means a very expensive change of instruments if we cannot repair it. On the social side we met up with Karen & Richard and had a bit of a tipsy night with them, met Cathy and Dave and had a bit of a tipsy night, visited our favourite restaurant where we were treated like long lost friends and stocked up on yummy Greek food. How to Check Your Autopilot (we were receiving the error “Drive Stopped”) 1. Checked to make sure there was no excessive steering load i.e. the wheel still turns freely 2. Checked the hydraulic drive unit (ours turned out to be ok) We applied 12V to the clutch terminals (it works as expected ie we cannot turn the wheel by hand) We applied 12V to the drive terminals and it turned the rudder – we reversed the polarity and the rudder turns in the opposite direction We checked inside the motor unit – there was a large amount of carbon dust that can often stop the motor. We cleaned it and there was still some carbon brushes left so although this was not the problem it will be in the near future if we don’t change the brushes.
3. Checked the rudder reference unit (our was ok) The rudder indicator is moving as expected With the rudder reference disconnected from the course computer, the resistance of the wires should be as follows (green/red 5K ohm; blue/green 1.7k ohm to 3.3k ohm depending on wheel position) 4. Checked the course computer We disconnected the drive and clutch unit, pressed Auto and did a 30 degree course change. There was a 12V output on the clutch output however the voltages on the drive output were jumping about from 0V to 6.5V. We think this may mean the power transistors on the course computer have failed and need replacing. |
