Keel and Frames
The
keel was laid on the 3 October 1997 this took around two weeks to complete.
Next came the frames they were laid out on the ground and tack welded together.
This showed up the first problem as the electricity supply kept tripping. The
supply was tested and we found that only 170 volts were present at the build
site end. The boatyard owner was not interested in this he said had never been
a problem for any one else. We measured the voltage at the supply side and it
was also only 170 volts. As I had already paid for the year and as I could not
move anywhere else, seven tons of steel and the entire base etc. were not
easily moved even if I had somewhere to go to.
The only solution was to buy a generator. I purchased a 6 kva generator and
continued building the frames. This took six weeks. By this time it was
December and getting very cold. No work took place over Christmas 1997 as we
had a lot of snow. My timing plan was starting to develop serious flaws. I had
not thought about the British winter and very seriously under estimated the
time it took to build the hull. I had not even placed the frames into the keel.
Building commenced at the end of January 1998. The frames were placed into the
keel one by one. Then the stringers were put into the slots in the frames. This
took six weeks. In my timing plan I had estimated that the keel complete with
side plates and frames and stringers would take six weeks to finish. It had
taken nearly 18 weeks to get this far, three times as long. Moral was low. I
spent the next 10 days measuring and making sure the frames, stringers and keel
were in the right place and at right angles to each other.
Here Steel Kit were helpful. I asked if they could measure the distances from
bottom of keel to the top of the bulwarks and although it took them two weeks
to do this the information finally arrived. All the measurements were spot on.
I could start tack welding on the keel plates.

The Plating of the Hull
This
was what I needed plates going on to the boat. At long last it started to look
like something. It only took a week to tack weld the starboard plates in place.
I then decided to weld these plates up inside and out. This took another week
as I was still using the stick welder.
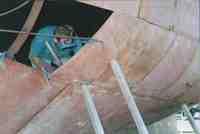
The port keel plates were then started. This proved to be a difficult
undertaking as welding proved to be a job for an acrobat and a very small thin
person. The keel plates at the bow were easy plenty of room as the keel was
accessible. The further aft I went the deeper and narrower the keel became and
reaching the transom area proved to be impossible. So I had to cut out a
section of keel plate and weld in a piece of flat bar so that the keel plate
could then be welded onto it. This part of the build took another week.
Next came the bottom plating. These plates went on without any problems both
sides were tacked in place within three weeks.
Top side plates next and these proved to be more difficult as no sky hooks were
available. I considered making a gantry so that I could attach a block and
tackle but this proved to be to expensive. The solution was to use muscle power
and even though it was very hard slow work it saved £300. The bow port bow
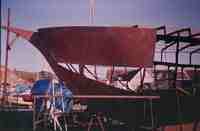
plate went on first this can be seen in the photo album section. It was the
biggest plate and it took two complete days to get right. Next came the port
bow plate, it again took two days. The remaining plates took three weeks to
complete. The boat was looking like a boat now. Take a look at the photo
section and you will see what I mean. It was the end of June 1998 and I was
exhausted. I needed a rest so we went on holiday to Spain.

Round Bilge Plate Section
Next came the round bilge section and
what a nightmare it was to be. Steel Kit had a ambitious design plan. They had
spaced the frames at 750mm the frames were made from 8mm flat bar. Their plan
was for me to hold up a 1500mm x 500mm plate section to the round bilge area,
angle it to around 30 degrees then a helper would mark the top of the topside
plate onto this flat plate. The plate would then be cut off at this line and
tack welded to the topside plate. Then using the remaining length of plate as a
lever the plate would then be bent round using chain and tackle and marked
again at the hull bottom plate. This area would again be trimmed and then
tacked welded to the bottom plating.
This was a good plan but had a minor flaw. The frames were set at 750mm
intervals and the actual plate size was 500mm wide. Of course this would never
work as the gap was too big and the frames were to far apart leaving a flat
section on the bilge plate. Yet another big design flaw with the kit. After a
week if photo taking and a lot of toing and froing Steel Kit finally admitted
that it was their mistake. The action plan was for me to hire a van and load up
all the round bilge plate and take it up to Steel Kit in Aberystwyth. There
were 18 plates per side and the van must have been very overloaded on the trip.
Steel Kit then in their wisdom decided to roll the plate at their plant which
took a whole day. I was not very familiar with the rolling process which turned
out to be a major disadvantage to me.
The rolled plate was loaded into the van and I drove back to Weston Super Mare.
The next day Ann and I commenced the plating. We started on the port side at
station one which was the datum frame. It took a whole day to measure up, mark,
cut, and tack weld this first plate into place. We were both exhausted when we
finished. It took the whole of the summer to complete tack welding both port
and starboard bilge plates. What we soon realised was that the rolling of the
plates was done on fixed radius rollers. The hull of course changes radius as
you go to the bow it gets bigger the closer you get to the bow and smaller the
closer you get to the transom. This proved to be one of the hardest obstacles
to overcome and made the job go on forever.


