Metamorphosis
The monarch butterfly is New Zealand’s most recognised and largest common butterfly. It was first recorded in 1873 and is considered native because it arrived here, island hopping across the Pacific from North America, and established itself without human intervention. Females lay about 40 eggs per day during the summer, up to a total of 400. Butterfly metamorphosis takes a month of so. The egg hatches and a caterpillar emerges, it eats the plant it was laid on and continues chomping and growing until it enters the third stage, the chrysalis. From the outside, it looks as if the caterpillar is just resting but inside things are rapidly changing and eventually a beautiful butterfly emerges and flies off to start the cycle all over again. Monarch butterflies have a life expectancy of 60-70 days but this extends to 6-7 months if they pupate in the autumn.
Monarch caterpillar on Brian’s garage wall As autumn advances, monarch butterflies in North America migrate from the north to overwinter in California and Mexico, sometimes travelling thousands of miles. Then in the spring, they retrace their flight north to reproduce. In New Zealand, they have found a different way of dealing with the cold. When the air temperature drops to 12.8˚C, the butterflies flock together in swarms in sheltered sites to keep warm, usually on the coast where temperatures are milder, at least 10˚C. They need trees with a rough bark on which to cling and a nearby source of nectar. They feed on warm days and as soon as temperatures increase, move inland to reproduce. Caramor has also undergone a metamorphosis, extensive work both inside and out.
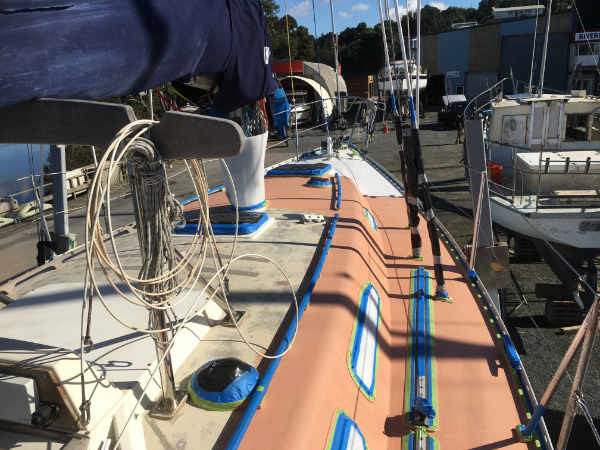
Caramor looking like a butterfly in its chrysalis A new deck emerges Now for the technical details: When Franco bought Caramor, we painted her deck with a non-slip paint without leaving margins. Nine years later the non-slip was badly worn and the gellcoat on the sides of the coachroof had become thin with many star fractures. We had to do something but weren’t sure how much to do. Our friend Steve Eichler, a reputed boat builder, talked us into doing a professional job and agreed to coach us through the process. We decided to re-introduce gloss margins as they would make it easier to keep the deck clean and paint the coachroof sides. Painting Caramor’s deck and coachroof took us over a month. We started late in the season and although Whangarei’s climate is mild, heavy dews meant we had to dry the deck every morning and were seldom able to start painting before noon. April/May is usually the start of the rainy season but we were lucky and, other than the odd shower, mostly enjoyed clear skies. Stage 1: We scraped off all the old non-slip paint then thoroughly sanded all surfaces to be painted, using 60 grit sandpaper. We didn’t remove deck fittings so masked them with blue tape (lasts longer than the green masking tape and doesn’t leave a sticky mess) to protect them from the paint. Stage 2: Primer Carboguard 504 (buff colour) Over the years Caramor has been painted with different types of paint. To make sure our new paint would stick to the deck, we needed to start from a firm base so we used this two pack primer. To avoid sanding between coats, we needed to recoat within 24 hours. To make sure we would end up with a sharp paint border, we masked deck fittings with green tape. All this preparation was very time consuming so we split the deck into five zones. For example on day 1 we painted zone 1 and prepared zone 2. Then the next day we painted zone 1 with the barrier paint, zone 2 with the primer and prepared zone 3, etc.
Carboguard 504 (part of the coachroof is the old paint) Stage 3: Altex Epoxy Barrier Undercoat (white colour) We applied three coats of epoxy barrier undercoat. At least with this paint we had a bit of breathing space as it is possible to overcoat up to 5 days later without the need for sanding.
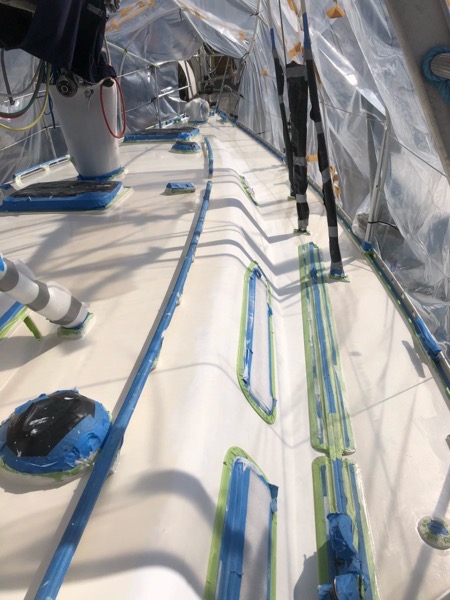
Altex Epoxy Barrier Undercoat Stage 4: Filling holes and low places with epoxy filler The three coats of barrier had helped level the deck surface but there were still a few holes, cracks and low places that needed building up with epoxy filler. Stage 5: Sanding Using a laser printer toner cartridge as a powder puff, we covered Caramor’s deck in black powder (‘Goth’ look for those of you familiar with fashion!). This revealed any irregularities that needed sanding (120 grit) and the final result was a deck as smooth as the proverbial baby’s bottom. It did seem crazy to be removing all this expensive paint we had just put on! Unfortunately, in places we had broken through the Carboguard. These needed patching before we could move on. On Easter Monday we finished the sanding but the forecast was for rain so we built a structure over Caramor (the chrysalis). By now the green tape was getting old so we took it all off and re-covered all the fittings with fresh green tape. Stage 6: another two coats of Altex Epoxy Barrier Undercoat For good measure - Steve isn’t a man who does things by halves. Rain was becoming a problem and we were frequently rained off as air humidity was too high for the paint to go off. We enjoyed a day doing other work to let the paint harden then we sanded it and removed all the green tape. Stage 7: Gloss E-Line 369 (vanilla white) This was the really scary bit, a two pack gloss is a difficult paint to apply correctly. The pros told us we needed perfect conditions: no rain, no sun, no wind and low humidity - not a chance in Whangarei where hot sunshine regularly gives way to heavy rain at the blink of an eye, and the humidity is always high. Steve lent us a colour chart and ‘vanilla white’ was Caramor’s colour. Wynn Fraser, the paint shop, mixed us a ‘vanilla white’ two pack gloss. Steve taught us to ‘roll and tip’, a process where you apply the paint with a roller and use a paintbrush to ‘stroke’ the paint smooth but in the end we found we got better results using a foam brush. We applied one coat over everything (because Steve, the guy in the shop and Simon said so) and a second on the margins and the coachroof sides where this is the final coat. Stage 8: Tredgrip (sand) Tredgrip is a non-slip paint with rubber particles already mixed in. We marked out the shapes we wanted using more green tape (curves take even longer) and sanded thoroughly with 320 grit (as per paint data sheet, but with hindsight we should have used 240 or coarser) and applied two coats, the first watered down with 20% water.
Tredgrip Stage 9: Touch-up Irritatingly, when we removed the green tape, in a few places it pulled up the gloss. We also found a few spots where the Tredgrip hadn’t stuck. Stage 10: Sealing all the edges This was the final marathon, Franco prepared all the edges by masking a 3mm strip which he sanded and cleaned with solvent. Steve applied the sealant-adhesive then ‘coved’ it, creating a smooth concave finish. To get into awkward spaces, such as under the cockpit coaming, he used a neat trick - he bent the adhesive cartridge nozzle. They were still hard at it at 8:30pm and working under deck spotlight. My only contribution to this final process was a couple of large take-away pizzas.
Franco preparing the edges We are very pleased with Caramor’s new look and hopefully these modern paints will last for many years to come. |